
Hfengyun is an official AWS service tier partner focused on providing customers with discounted AWS billing and a range of technical support.

©2024, hfengyun. AWS Discounted Billing | AWS Partner Network
In this article, we will examine how to leverage AWS Lambda and S3 services in various scenarios. We will present all code samples and utilize the AWS CDK for infrastructure-as-code.

In this article, we will look at leveraging AWS Lambda and S3 services in various scenarios. All code samples will be presented, and the AWS CDK will be utilized for infrastructure-as-code.
This section explains how to read S3 items from AWS Lambda.
Bucket Creation
A new storage bucket is created, as demonstrated in the code sample below. S3 is a global service, thus bucket names must be unique. As a result, we suffix the bucket ID with a unique identifier to ensure that AWS does not generate an error if this code is executed by several users.
If we destroy the stack in a development environment, we want to remove all objects from the bucket. In a production setting, we want to keep all of the items. We will employ the proper deletion approach based on the environmental variables.
const bucketId = ulid().toLowerCase();
    const isProd = process.env.isProd ?? false;
    const isDev = !isProd;
    const removalPolicy = isDev ? RemovalPolicy.DESTROY : RemovalPolicy.RETAIN;

const bucket = new s3.Bucket(this, 'S3Bucket', {
      bucketName: `aws-lambda-s3-${bucketId}`,
      autoDeleteObjects: isDev,
      removalPolicy,
});In this scenario, because we set the autoDeleteObjects option to true, AWS CDK will automatically create extra lambdas to delete the S3 bucket’s objects when we destroy the stack or if the bucket name changes. The constructed lambda can be seen in the Amazon Web Services dashboard.
The lambda function
We then create the lambda function (using the nodejs 16 runtime). We pass the bucket name to the lambda function as an environment variable to be read in the lambda function. Note that we need to give the lambda function read access to the bucket (as shown in the last line of the code snippet below)
    const nodeJsFunctionProps: NodejsFunctionProps = {
      bundling: {
        externalModules: [
          'aws-sdk', // Use the 'aws-sdk' available in the Lambda runtime
        ],
      },
      runtime: Runtime.NODEJS_16_X,
      timeout: Duration.minutes(3), // Default is 3 seconds
      memorySize: 256,
    };

    const readS3ObjFn = new NodejsFunction(this, 'readS3Obj', {
      entry: path.join(__dirname, '../src/lambdas', 'read-s3-obj.ts'),
      ...nodeJsFunctionProps,
      functionName: 'readS3Obj',
      environment: {
        bucketName: bucket.bucketName,
      },
    });

bucket.grantRead(readS3ObjFn);Roles and Policies for Lambda
By default, Lambda will have the AWSLambdaBasicExecutionRole, which has write permissions to CloudWatch. Because we gave read permissions to the bucket, the AWS CDK will build dynamic policies with the following permissions. The IAM service in the AWS console displays the same information.
{
    "Version": "2012-10-17",
    "Statement": [
        {
            "Action": [
                "s3:GetBucket*",
                "s3:GetObject*",
                "s3:List*"
            ],
            "Resource": [
                "arn:aws:s3:::aws-s3-lambda-random-id",
                "arn:aws:s3:::aws-s3-lambda-random-id/*"
            ],
            "Effect": "Allow"
        }
    ]
}Lambda Function Code:
The Lambda function code is quite easy. We obtain the bucket name from the environment variable. We might have hard coded the bucket name. We pass the bucket name as an environment variable because it is dynamically generated.
We wish to read the contents of the S3 object input-file.txt, which we supplied as the object key. Finally, we read the file’s contents and print them to the terminal (which we can see in CloudWatch).
import { S3Event } from 'aws-lambda';
import * as AWS from 'aws-sdk';

export const handler = async (
  event: S3Event,
  context: any = {}
): Promise<any> => {
  const bucketName = process.env.bucketName || '';
  const objectKey = 'input-file.txt';

  const s3 = new AWS.S3();
  const params = { Bucket: bucketName, Key: objectKey };
  const response = await s3.getObject(params).promise();
  const data = response.Body?.toString('utf-8') || '';

  console.log('file contents:', data);
};All AWS resources are created after you deploy the stack with cdk deploy.
Testing
Log in to the AWS console and choose AWS S3. You can see bucket names starting with aws-lambda-s3. My bucket name is unique to me, whereas your bucket name will be different.
Create a text file called input-file.txt that contains some example content. You can enter anything into the text file. I simply typed “Hello world.” Save the file, then upload it to the load bucket.
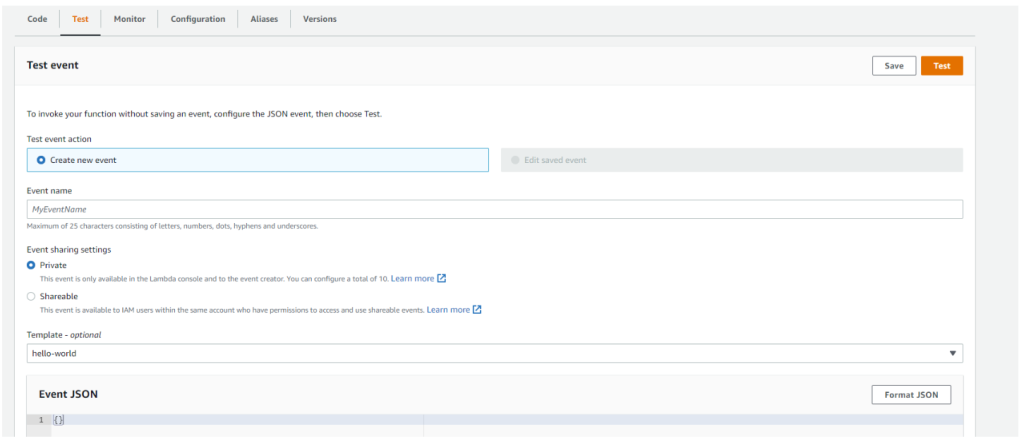
Then, in the console, pick the Lambda service, the Test tab, and the Test Functions button, as shown below. You can send an empty object as an event because our lambda function will not use it.
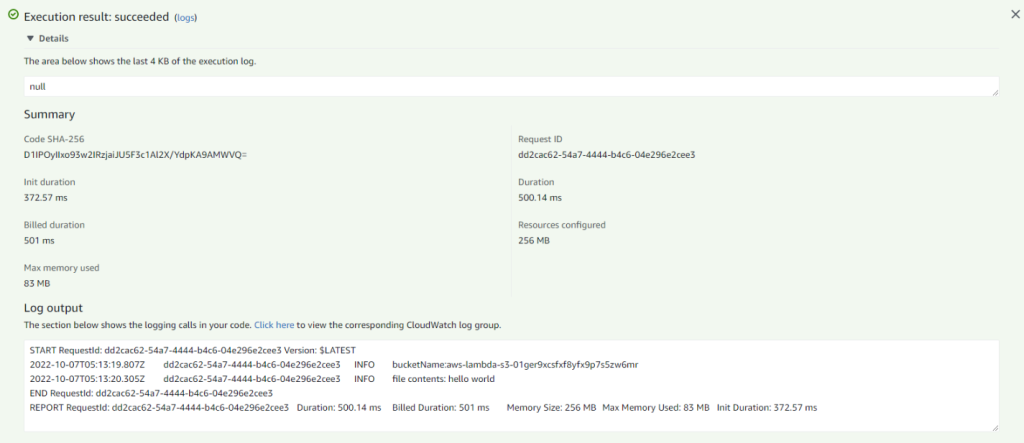
When you click the Test button, lambda is executed, and you can view the results. You may also view the execution logs via CloudWatch.
Read an S3 item from AWS Lambda using a trigger.
In most circumstances, you don’t want to run lambda manually. Instead, we want the lambda to run automatically when uploading a file to an S3 bucket.
As illustrated in the image above, when an object is uploaded to an S3 bucket, a lambda function is called using S3 object metadata as the event payload. Within lambda, the contents of the S3 object are read and reported to the console.
Add an event source for the lambda function.
We only need to add the event source to the lambda function. In the code snippet below, we’ve added an S3 event source with OBJECT_CREATED as the trigger event for the lambda, ensuring that the lambda is called whenever an object is created in the S3 bucket. Internally, AWS CDK will construct new lambdas to handle the plumbing.
    readS3ObjFn.addEventSource(
      new S3EventSource(bucket, {
        events: [s3.EventType.OBJECT_CREATED],
      })
);There are numerous events available that can be used as event sources for your lambda functions. The following are some of the most often-used events.
Lambda Function Code
The Lambda function code is modified, as shown below. We will get the bucket name from the event payload.
export const handler = async (
  event: S3Event,
  context: any = {}
): Promise<any> => {
  for (const record of event.Records) {
    const bucketName = record?.s3?.bucket?.name || '';
    const objectKey = record?.s3?.object?.key || '';

    const s3 = new AWS.S3();
    const params = { Bucket: bucketName, Key: objectKey };
    const response = await s3.getObject(params).promise();
    const data = response.Body?.toString('utf-8') || '';
    console.log('file contents:', data);
  }
};Testing
You can delete the old file input-file.txt and upload it afresh. The lambda function will be performed as soon as you submit the file. You may see the execution logs in the CloudWatch service.

Uploading several files at once
When many items are uploaded, lambda will be called for each of them. For example, if you upload three files to the bucket, lambda will run three times.
Write a file to an S3 object using Lambda.
In this part, we will write contents to an S3 object.
Lambda Function Permissions
Lambda function attributes are comparable to previous lambda functions. The only difference is in permission. To allow Lambda to write to the S3 bucket, we must grant it write permission (as seen in the last line of the code snippet below).
const writeS3ObjFn = new NodejsFunction(this, 'writeS3ObjFn', {
      entry: path.join(__dirname, '../src/lambdas', 'write-s3-obj.ts'),
      ...nodeJsFunctionProps,
      functionName: 'writeS3ObjFn',
      environment: {
        bucketName: bucket.bucketName,
      },
    });

bucket.grantWrite(writeS3ObjFn);Lambda Function Code
We simply want to write some stuff to the s3 object output-file.txt. Please keep in mind that this lambda produces an S3 object with the contents.
import { S3Event } from 'aws-lambda';
import * as AWS from 'aws-sdk';
import { PutObjectRequest } from 'aws-sdk/clients/s3';

export const handler = async (
  event: S3Event,
  context: any = {}
): Promise<any> => {
  const bucketName = process.env.bucketName || '';
  const objectKey = 'output-file.txt';

  const s3 = new AWS.S3();
  const params: PutObjectRequest = {
    Bucket: bucketName,
    Key: objectKey,
    Body: 'Contents from Lambda',
  };
  await s3.putObject(params).promise();
  console.log('file is written successfully');
};Once the file is written with the content supplied in the Body parameter on the putObject method, we write a success message to the console, which we can view later from CloudWatch.
Testing
Open the AWS console and choose the Lambda service. Select the Test tab and click the Test button, passing an empty event object as we did earlier.
The function will be performed, and a new S3 object named output-file.txt will be created in the bucket.
Write to the local file system, then upload to S3.
In this part, we will use Lambda to upload a file from the local file system to an S3 bucket. Aside from the /tmp directory, Lambda has read-only access to the underlying file system. If you need to write anything, you can only do it in the /tmp directory.
import { S3Event } from 'aws-lambda';
import { promises as fsPromises } from 'fs';
import * as AWS from 'aws-sdk';
import { PutObjectRequest } from 'aws-sdk/clients/s3';

export const handler = async (
  event: S3Event,
  context: any = {}
): Promise<any> => {
  const bucketName = process.env.bucketName || '';
  const objectKey = 'output-file.txt';
  const filePath = `/tmp/${objectKey}`;

  await fsPromises.writeFile(filePath, 'Contents from Lambda to local file');
  const fileContents = await fsPromises.readFile(filePath);

  const s3 = new AWS.S3();
  const params: PutObjectRequest = {
    Bucket: bucketName,
    Key: objectKey,
    Body: fileContents,
  };
  await s3.upload(params).promise();
  console.log('file is uploaded successfully');
};Please keep in mind that we are employing a different mechanism here–the S3 upload method.
Trigger AWS Lambda depending on the S3 object prefix and/or suffix.
In some circumstances, you may want to trigger a lambda function based on the S3 object key’s prefix and/or suffix. For instance, another application in your system may create S3 objects with the key format sales/{date-of-sale}.
For example, the name of the S3 object could be sales/10/12/2022, indicating that the sales occurred on October 12th. You must apply some business logic by processing the sales data.
For example, suppose we try to upload two files, one with a matching prefix (shown in green) and the other without (shown in red). S3 object notifications would only be issued for the prefix that matches. Please keep in mind that nothing has changed with the lambda function. S3 event notifications handle all the filtering.
Lambda function: Trigger Source
You may apply filters to S3 event alerts, as seen below.
    readS3ObjPrefixFn.addEventSource(
      new S3EventSource(bucket, {
        events: [s3.EventType.OBJECT_CREATED],
        filters: [{ prefix: 'sales/' }],
      })
);eadS3ObjPrefixFn denotes the lambda function. Previously, we utilized simply the events property. We’ve now utilized the filters property to filter just the items with the prefix sales/.
As previously stated, AWS CDK will construct an extra lambda for this notice.
Lambda function’s source code
There will be no changes to the lambda source code. However, if you wish to extract the date component from the object key, use the code snippet below.
import { S3Event } from 'aws-lambda';
import * as AWS from 'aws-sdk';
import { format, parse } from 'date-fns';

export const handler = async (
  event: S3Event,
  context: any = {}
): Promise<any> => {
  for (const record of event.Records) {
    const bucketName = record?.s3?.bucket?.name || '';
    const objectKey = record?.s3?.object?.key || '';

    //Take only the date part
    const salesDateInStr = objectKey.replace(`sales/`, '').substring(0, 10);
    //Parse the date so that it can be used later
    const salesDate = parse(salesDateInStr, 'MM/dd/yyyy', new Date());

    const s3 = new AWS.S3();
    const params = { Bucket: bucketName, Key: objectKey };
    const response = await s3.getObject(params).promise();
    const data = response.Body?.toString('utf-8') || '';
    console.log(`sales on ${salesDate.toISOString()} :`, data);
  }
};We’ve utilized the prefix filter. You may use both the prefix and suffix properties in filters.
Testing
When you try to upload a file that contains the / character, it will fail. So, to upload a typical file to an S3 object with keys including /, use the aws cli command listed below. In the following AWS CLI command, we want the file sales.txt to be uploaded as sales/10/12/2022/sales-data.txt S3 key in the bucket aws-lambda-s3-01gev17npa6m6yqfwy7rnfepda
aws s3 cp sales.txt s3://aws-lambda-s3-01gev17npa6m6yqfwy7rnfepda/sales/10/12/2022/sales-data.txtGet S3 pre-signed URL from Lambda.
Consider the following scenario: you’re constructing an API and want to upload a huge file to one of its endpoints. A high-level system design might look somewhat like the following.
However, there is a little flaw with this strategy. If you attempt to upload a file larger than 10 MB, it will fail since the API Gateway’s payload size restriction is 10 MB.
The answer to this problem is to utilize lambda to build a pre-signed URL for the s3 object, which can then be used to upload a file straight from the client (in our example, a browser) by passing the full application backend (Gateway and Lambda).
How it works.
The call to construct the pre-signed URL makes use of the security token service to establish short-term credentials and a token. When you produce the pre-signed URL, you must give the operation name; the generated URL is only valid for the chosen operation (putObject in our example). When we attempt to upload the file, it utilizes the created security token. This token has an expiry time after which it will become invalid.
The created URL has the following query parameters.
Infrastructure code
The infrastructure code will be identical to the current code. Also, please remember to allow bucket write access to the Lambda function.
const bucket = new s3.Bucket(this, 'S3Bucket', {
      bucketName: `aws-s3-lambda-presigned-url`,
      autoDeleteObjects: isDev,
      removalPolicy,
    });

 const nodeJsFunctionProps: NodejsFunctionProps = {
      bundling: {
        externalModules: [
          'aws-sdk', // Use the 'aws-sdk' available in the Lambda runtime
        ],
      },
      runtime: Runtime.NODEJS_16_X,
      timeout: Duration.minutes(3), // Default is 3 seconds
      memorySize: 256,
    };

 const presignedUrlFn = new NodejsFunction(this, 'preSignedUrlFn', {
      entry: path.join(__dirname, '../src/lambdas', 'pre-signed-url.ts'),
      ...nodeJsFunctionProps,
      functionName: 'preSignedUrlFn',
    });

bucket.grantWrite(presignedUrlFn);Testing
When you run lambda, we will obtain the pre-signed URL. We may make a PUT request to the pre-signed URL we received from Lambda.
To obtain the pre-signed URL, you may manually execute lambda from the AWS interface. In the Body tab of the following window, you may pick binary content and upload the image large-file.jpeg.

Once the request is successful, you may view the uploaded file in S3.
6 RAFFLES QUAY
Singapore
+65 80951058
sign230203@gmail.com
©2024, hfengyun. AWS Discounted Billing | AWS Partner Network